Guides / Plan the deck
Boarding around loft tanks, pipes and services
Plan a raised loft deck around cold-water tanks, pipes, ducts, cables, valves and inspection routes.
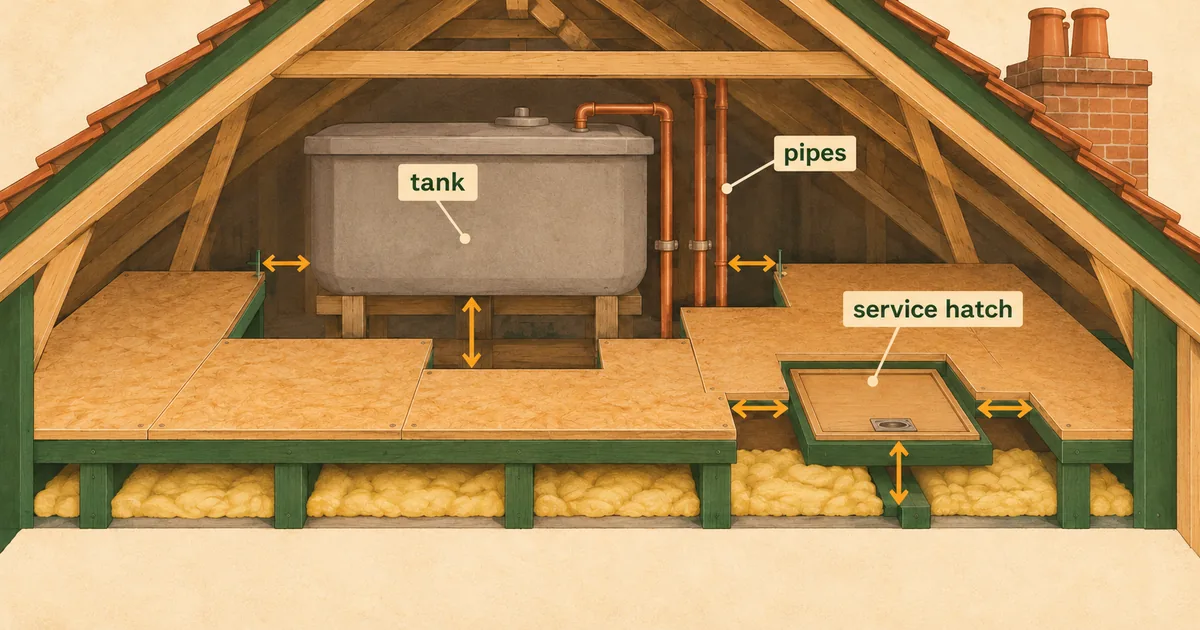
Services need room for inspection, maintenance and replacement. Do not board tightly around a cold-water tank, bury valves and junctions or trap ventilation ducts under boxes. A smaller deck with a clear service route is usually more useful.
Draw a service map
Mark tanks, overflow and warning pipes, isolation valves, pipe joints, electrical junctions, extractor ducts, aerial equipment and solar components. Photograph each route before adding insulation or supports. Add measurements from fixed landmarks so a future owner can find them.
Decide which items require frequent access and which may need complete replacement. A removable inspection panel is not enough if a whole tank cannot be reached or lifted out.
Cold-water tanks
Cold-water storage cisterns need suitable lids, insulation and accessible valves. The arrangement of insulation around and below a tank affects frost protection because warmth from the rooms below may be intended to reach it. Follow the tank-jacket and plumbing guidance rather than wrapping every surface by instinct.
Do not load the tank platform with stored boxes or attach a raised deck to it without design. Water is heavy and the tank support is a specific structural item. Leatmere's confirmed loft cold-water tank guide explains tank, pipe and overflow considerations in more detail.
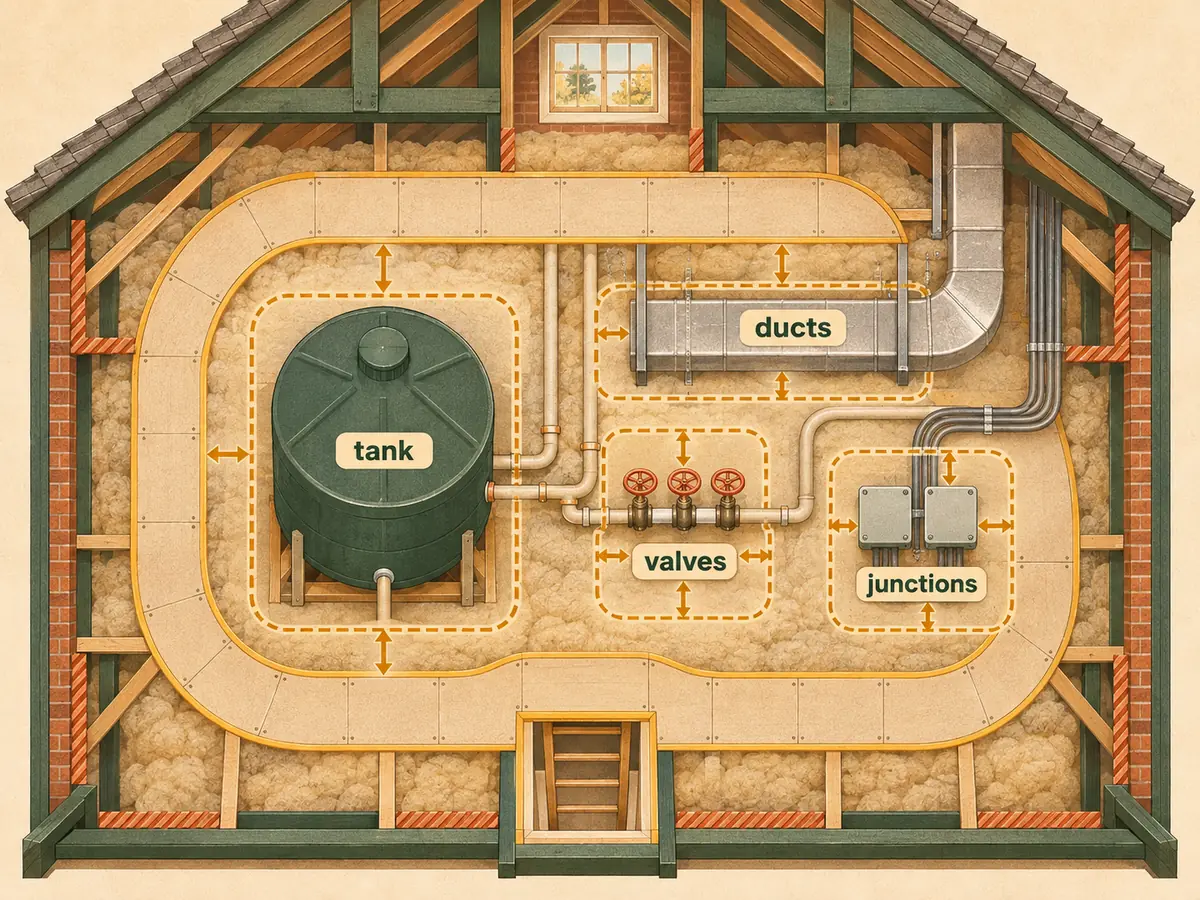
Pipes and valves
Insulate pipes in the cold loft with material suitable for pipe size and environment. Keep valve handles operable and label their function. Do not screw through hidden routes or compress pipe insulation beneath a board.
Allow for movement and leak inspection. A small drip hidden under mineral wool can damage the ceiling before it becomes visible. Where a board crosses a service route, use only a designed support arrangement that preserves clearance.
Ducts and ventilation
Bathroom and kitchen extract ducts should discharge outdoors, not into the loft. Support ducts to the fan and terminal maker's instructions, avoid crushing flexible duct and maintain access to joints. Condensation inside poorly arranged ductwork can mimic a roof leak.
Do not block eaves or roof vents with stored items. Keep the deck back from low edges and leave a visual inspection route.
Electrical services
Keep junction boxes accessible and cables protected from screws. Insulation can affect cable current capacity, so ask a registered electrician before burying or rerouting circuits. Downlights below must have the clearances or rated protection specified by their maker.
Do not rest metal rails on cables or pinch them between supports and joists. Mark no-screw zones visibly during installation.
Solar and heating equipment
Inverters, ventilation units, pumps and controls may have specified clearances and service zones. Their weight and heat output need product-specific design. Do not use the surrounding area for storage unless the installer confirms it remains safe and accessible.
Any gas appliance or flue in a loft is outside an ordinary boarding job. Use a Gas Safe registered engineer for gas work and preserve the appliance's access and ventilation requirements.
Make access durable
Use clear labels, not loose scraps of paper. Keep a torch, but do not store flammable liquids. Provide a continuous walkway to service points and a stable working area only where the structure is suitable.
Review the map after any plumber, electrician or roofer visits. A later cable or pipe can invalidate the original no-screw zones.
Design removable access properly
A loose offcut placed over a gap is not an access panel. If the floor system permits removable boards, support every edge as the maker requires, use repeatable fixings and mark the lift point. The panel must return flush so it does not become a trip hazard. Do not weaken tongue-and-groove edges casually to make a hatch.
Place panels where a person can kneel or stand on confirmed supported boarding while opening them. The service beneath should be reachable without leaning across exposed insulation. Keep a clear zone above valves and junctions instead of filling it with boxes that have to be removed during an emergency.
For a large component, plan the replacement route, not just hand access. A tank, fan or inverter may need to pass back through the loft hatch. Rails and boards should not permanently cage equipment that has a shorter service life than the building.
Pipe and tank winter check
Before cold weather, inspect pipe insulation continuously from the warm envelope to the tank or outlet. Joints, bends and valves need compatible details. Do not cover warning or overflow pipe ends, and investigate any discharge rather than directing it beneath boarding.
Check the tank lid is secure and the jacket remains correctly arranged. Damp insulation loses usefulness and can hide leaks. If the system is redundant, have a competent plumber identify, isolate and remove it safely instead of leaving unknown water-filled pipework under the deck.
Handover record
Keep a one-page plan with the date, board system, photographs, pipe routes, cable zones and panel labels. Note the location of stop valves and electrical isolation. Store a copy outside the loft so it can be found during a leak or power fault.
Tell anyone using the storage area which zones must remain empty. A painted line around equipment or a fixed label is clearer than a verbal instruction. Review the plan after every service visit, because later trades may introduce a new joint, cable or duct.