Guides / Access and lighting
How to measure a loft hatch and ladder
Record clear opening, floor height, stowage, swing and raised-deck transitions before choosing a loft ladder.
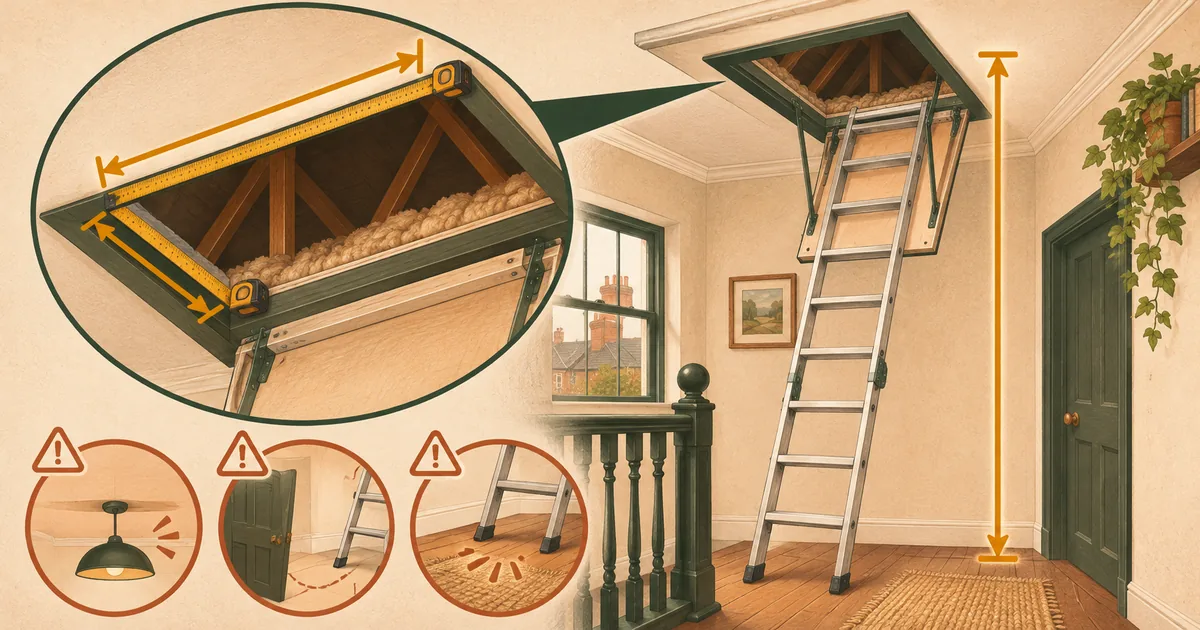
Measure the existing opening and the space around it, then compare every value with the exact ladder manual. Nominal hatch size, ceiling cut-out and clear opening are not always the same. Record millimetres and take each dimension more than once.
The measurement sheet
Record clear opening length and width after stops and trim, ceiling opening length and width, floor-to-loft-floor height, ceiling thickness, joist depth, available stowage length, swing clearance below, landing space and obstructions. Note which way the hatch opens and whether the lid lifts into the loft or drops down.
Draw a plan and section. Mark water tanks, pipes, cables, truss webs and the proposed raised deck edge. Photographs with the tape visible help when discussing the job with a supplier or installer.
Floor-to-loft-floor height
Measure vertically from the finished landing floor to the level where the ladder's top fixing and user transition will be. Do not measure along the ladder angle. An uneven floor should be checked at the feet positions.
Werner and DOLLE publish maximum heights for individual models. Extensions and trimming rules are model-specific. A ladder that is too short or too long cannot simply be set at a different angle unless the manual permits it.
Clear hatch opening
Measure between the narrowest fixed points. Check the opening at both ends because old frames can taper. The lid, hinges and catches may reduce usable space. A sliding ladder usually requires a minimum opening independent of the decorative trim.
An integrated folding ladder comes with its own casing and needs a specified structural opening. Do not enlarge an opening by cutting an unknown joist or truss. A competent carpenter or engineer should design the trimming.
Stowage and projection
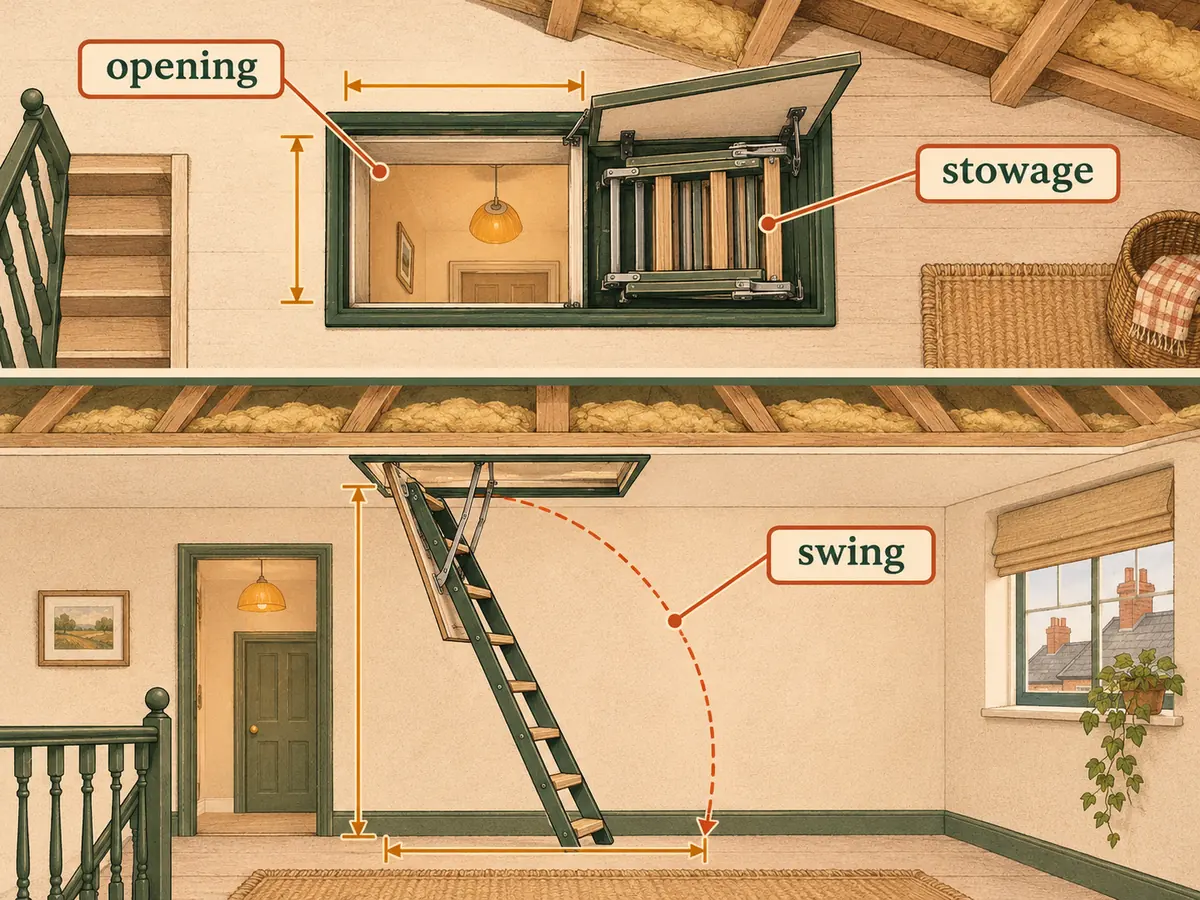
A sliding ladder occupies length inside the loft when retracted. Measure from the fixing line in the direction it will store, allowing for roof slope, braces and tanks. The deployed ladder also projects into the landing; keep doors and circulation routes clear.
Folding ladders need swing clearance as sections unfold. Concertina mechanisms need their own envelope. Compare the maker's diagram, not a generic type description.
Raised deck transition
If the deck sits 175 mm or 300 mm above joists, plan the step from the ladder. The user needs a stable handhold and an obvious landing, not a loose box or exposed insulation. Some arrangements fix a ladder at joist level; others integrate it with a designed raised platform. Follow the ladder and floor-system instructions together.
Keep sufficient unboarded space for the mechanism without creating a fall edge. A guard or upstand may be appropriate, but it must not obstruct folding or emergency withdrawal.
Hatch thermal detail
Measure the lid depth and condition if it will remain. Add compatible insulation and draught seals without fouling hinges or catches. An integrated unit such as DOLLE clickFIX publishes a component U-value, but the perimeter joint also needs correct air sealing.
Condensation staining around the hatch can indicate warm air leakage. Address room ventilation and sealing rather than hiding the mark with new trim.
Before ordering
Download the current model manual. Tick every minimum and maximum dimension, check the supplied fixings and identify the required supporting timber. Confirm delivery size: an integrated casing must reach the opening through the house.
If any value sits at a limit, ask the maker or competent installer in writing. Do not round a 2735 mm height down to “2.7 m”. Keep the measurement sheet with the house documents for future replacement.
Check the approach below
The landing matters as much as the opening. Mark the deployed feet on the floor and ensure a door cannot strike the ladder. Confirm there is space to stand facing the rungs and that a person can open the hatch without leaning over a stairwell. A ladder over stairs or in a cramped corner needs specialist design.
Measure skirting, radiators and ceiling fittings that affect the footprint. Check whether the ladder blocks the normal escape route while deployed. If several people share the home, consider who can operate the weight and mechanism safely rather than assuming one successful demonstration settles usability.
Check the approach above
At loft level, measure headroom where the user's shoulders and hands emerge, not only at the centre of the hatch. Identify a sound handhold that does not rely on a truss web as an improvised grab rail. The first step onto the raised deck should be obvious, level and illuminated.
Recheck every dimension after insulation and boarding plans are fixed. A 175 mm raised deck changes the transition, and a rail near the hatch may occupy space shown as clear on the original survey. Coordinate the ladder installer and floor-system manual before either job closes the area.
Finally, rehearse how the ladder will be inspected, cleaned and eventually removed. Fixings and moving parts should remain accessible without dismantling a permanent storage wall.
After installation, repeat the critical measurements and keep them with the model number. Confirm the ladder feet bear evenly, locks engage, sections do not rub the hatch and the stowed unit clears insulation and stored items. Operate it several times without carrying anything. If the mechanism behaves differently from the manual or the casing shifts, stop using it and ask the installer or maker for advice.